Step-by-Step Instructions for Installing Styrofoam Ceiling Tiles
Tools and Materials Needed for the Project:
- Utility knife – used to cut the ceiling tiles to proper size when a full tile won’t fit -- a box cutter or wallpaper knife will also work
- Adhesive – Instant Grab (Akfix) - Comes in a tube and it is available here.
- Caulk – color that matches your tiles – this is to fill any gaps between tiles that may occur. (We often use this kind)
- Gloves – these help to keep your hands clean while working with caulk and mastic – form fitting rubber gloves are ideal
- Caulking gun – used to apply the caulk – look for a model designed to discourage drips
- Sponge – this is used to wipe off excess caulk and mastic – a clean rag will also work and either should be rinsed often
- Straight edge – handy for cutting tiles – a four foot level or any metal rule longer than two feet should work
- Measuring tape – used for laying out your ceiling design
- Carpenter’s pencil – any pencil will do, but the marks of a heavy duty carpenter’s pencil are easy to see
- Chalk line – used for installation guidelines
All of these materials should be available at your local hardware or home improvement store. It’s usually a good idea to gather everything needed prior to starting the project.
Utility knifes are very sharp – always guard against injuries when cutting your ceiling tiles – tiles should be secure and on a flat surface when trimming.
Instruction:
 |
Step 1Proper Surface
Important!!!
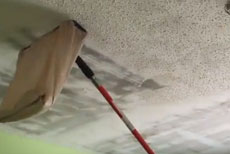
Do NOT attempt to apply Styrofoam ceiling tiles over a popcorn ceiling that is soft or unstable. If the surface falls into these categories or is questionable, always remove the popcorn before installing the tiles – simply soak the popcorn with water and scrub it off the surface. |
 |
Step 2Preparing the Surface
|
 |
Step 3Take Your Time
|
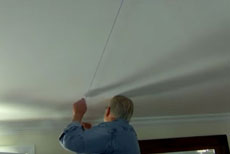 |
Step 4Find the Center of your Ceiling
|
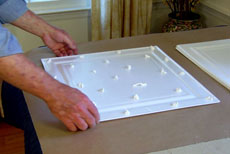 |
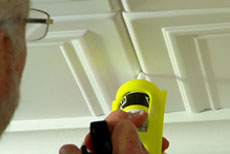
Step 5Applying Adhesive to Tiles
|
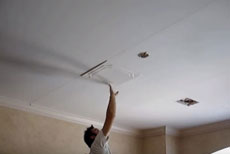 |
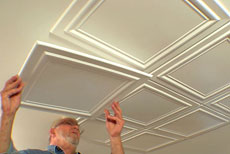
Step 6Installing the First Tile
|
 |
Step 7Proper Adhesion
|
 |
Step 8Proper Spacing
|
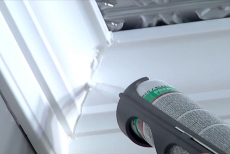 |
Step 9Final Caulking
|
Hopefully these instructions will help with your ceiling installation, but if you have any questions, please feel free to contact use if you have any questions..
![]() Ceiling / Wall Tile Project Estimator
Ceiling / Wall Tile Project Estimator
Available Sample Packs
Ceiling Tiles
- What are The Ceiling Squares Called
- What are Drop Ceiling Tiles Called
- 2x4 Ceiling Panels
- Black Ceiling Panels
- Bead Board for Ceilings
- Drop Ceiling Tiles
- Wood for Ceiling
- How Much Do Drop Ceiling Panels Cost
- Corrugated Tin Ceiling
- Rustic Tin Ceiling
- Wood Panel Drop Ceiling
- Dropped Coffered Ceiling
- Tin Drop Ceiling Tiles
- Modern Drop Ceiling Tiles 2x4
- Faux Wood Ceiling Planks
Wall Panels
Moldings
- Decorative Crown Molding
- 4 5/8" Crown Molding
- Crown Molding Inside Corner Blocks
- Ceiling Wall Trim
- Crown Molding Cathedral Ceiling
- Crown Moulding Corner
- Molding Panels
- Inside Corner Molding
- Best Crown Molding for Low Ceilings
- Metal Trim Decorative
- LED Lighting for Crown Molding
- Styrofoam Crown Molding
- 6 in Baseboard
- Trim Corner
Popular Pages
- Can Faux Wood Beams Be Painted
- Ceiling Medallion Octagon
- Light Ceiling Medallion
- Ceiling Medallion 36
- Ceiling Medallion Oval
- Ekena Millwork Ceiling Medallion
- J Track
- Ceiling Tile
- Faux Wood Mantels
- Rectangular Ceiling Medallions
- Marble Columns for Sale
- Column Capitals
- Faux Rock Paneling
- Large Ceiling Medallions
- Peel and Stick Door Skins
- Chandelier Decorative Ceiling Medallions