General
- General Questions
- Faux Wood Beams
- Returns
Why should someone add ceiling decoration to their home?
The ceiling is the largest area of the room that mostly gets overlooked during renovation. This is a shame because the ceiling is like a blank canvas that will not be covered with furniture or rugs, artwork, etc. For this reason, if you decorate your ceiling makes a huge difference. Also, many surfaces, including a popcorn ceiling or old stapled on 12x12 acoustical tiles can be easily covered with decorative ceiling tiles.
How should someone decide on the finish for the tiles?
Based on the decor of the rest of the room, individual taste, and the height of the ceiling. Lighter colors make the room feel airier, and open. Darker colors for warmer looks and to match darker stained furniture.
Can you use the tiles elsewhere than on the ceiling?
Accent walls, backsplashes. Consider smaller patterns for the backsplash.
Why do your tiles work so well in historic homes?
Because they are from that era. Tin ceilings have been around for about 150 years and were used in Victorian homes a lot. We have done many replicas over the years to match existing ceiling tiles and cornices to preserve the historical value of residential and commercial properties.
Do your tiles work for new builds as well?
Absolutely! When you are building a new home there is flexibility that you may not have when renovating, which makes it easier to incorporate decorative ceiling tile in your new home.
Can I use decorative ceiling tiles on a ceiling with recessed lighting, vents and fans?
Yes you can and some of them will work better than other. Milan Jara has created a video that explains this in detail:
Do I need to use nail up or glue up ceiling tiles?
First thing you need to do is to look at your ceiling and determine the surface you have. You can use glue up tiles for most flat surfaces but if you have a plywood or wood ceiling, you can also use nail up tiles.
How do I estimate the number of ceiling tiles I need for my project?
Please refer to our
What Materials Comprise Faux Wood Beams?
Our Architectural Products employs a high-density polyurethane foam (HDF) material for the production of our faux wood beams. This lightweight material simplifies installation, yet maintains a solid and resilient composition.
Do Faux Beams Resemble Authentic Wood?
Absolutely. We create our faux wood beams by carefully shaping them with molds taken from real wood beams. This helps our decorative beams imitate the natural wood look, including its grain pattern. Our QuickShip faux wood beams are exactly the same since they are made in one piece — installers usually flip these beams to change the texture design. We also offer custom beams that are one-of-a-kind, as each can have small differences from the others.
What is the Price of Faux Wood Beams?
The commonly chosen sizes of Volterra faux wood beams are priced between $200 and $750 per beam. The expense of our faux wood beams is influenced by the specific beam type you select, plus the shipping costs. Opting for faux wood beams can help you save money compared to the cost of real wood ceiling beams and the associated installation expenses.
Do Faux Wood Beams Last Long?
Definitely! Faux wood beams exhibit unexpected solidity and resilience, particularly in locations like ceilings where they aren't exposed to rough treatment. Unlike real wood beams, our imitation beams won't twist, fracture, lose color, or decay. Furthermore, these artificial wood beams are nearly maintenance-free!
Is Installing Faux Beams Simple?
Installing faux beams is easy. Due to our decorative beams being crafted from durable yet light polyurethane material, they are very manageable and can be installed on a ceiling within a few hours. If you're comfortable with carpentry and have some skills, you can likely handle the installation without trouble. However, for optimal outcomes, it's advised to collaborate with a licensed contractor.
What Tools Are Required for Installing Faux Wood Beams?
You can set up faux wood ceiling beams with a hand saw, drill, tape measure, and a pencil or marker. To gather more information about the tools you'll need and the installation process for faux wood beams, take a look at this video.
Is It Possible to Use Faux Wood Beams Outdoors?
Absolutely, faux wood beams are suitable for both indoor and outdoor applications. Homeowners have the option to enhance the visual appeal and ambiance of their outdoor living areas and covered patios by incorporating outdoor faux wood beams.
Do Faux Wood Trusses Work Well for Any Ceiling?
In addition to decorative beams, Faux wood trusses are an excellent choice for elevating tall ceilings. We provide decorative trusses designed for both flat and sloped ceilings.
Do We Craft Customized Beams and Trusses?
Yes, we do offer personalized beams and trusses. In addition to our standard faux beams and decorative trusses, We can create custom beams and trusses tailored to your specific needs and preferences.
What is the Weight of Faux Wood Beams?
Commonly chosen or standard sizes of our imitation wood beams have a weight of 1-2 pounds per linear foot, amounting to roughly 10-40 pounds per beam. This stands in significant contrast to genuine wood beams, which could weigh around 600 pounds and necessitate heavy machinery for installation. Even box beams, which are much heavier than polyurethane foam beams, present a substantial difference in weight.
Is it Possible to Utilize Faux Wood Beams for Concealing Current Drywall Beams?
Absolutely, without a doubt. Faux wood beams offer an excellent solution for concealing structural glulam or drywall beams, unsightly wooden beams, pipes, cords, or fixtures.
Do We Provide Faux Wood Beam Installation Services?
While our dedication to offering top-notch service is unwavering, it's important to note that we solely function as a manufacturer. As a result, we don't have any involvement in the installation process. For optimal outcomes, we highly recommend collaborating with a licensed contractor who possesses the expertise needed for the task.
Can We Offer Technical Assistance for Orders of Faux Wood Beams?
Our website provides installation videos, documents, resources, and additional technical details for every product we offer. If you're collaborating with a skilled installer, they can supply you with design insights and installation suggestions. In case you're unable to locate the specific information you need, don't hesitate to contact our beam specialists; they're more than willing to assist you - just reach out to our team.
Do We Produce Authentic Wood Beams?
Absolutely! Alongside our diverse array of faux wood beams, we creates box beams from natural hardwood and softwood in nearly any desired wood species. To gather more information, just reach out to our team.
View Our Return & Replacements Policy
Ceiling Tiles
- Custom Tin Ceiling Tiles
- Styrofoam Ceiling Tiles
- Faux Tin Ceiling Tiles
- Metal Ceiling Tiles
Are you able to create a design from CAD drawing?
Yes
Can you replicate a tile from a sample?
Yes
Can you create a design from hand drawing?
Yes
Are you able to help us develop a design?
Yes
Do you have the ability to create custom sizes?
Yes
Can you create custom colors?
Yes
What are the costs involved?
Styrofoam Ceiling Tiles are 19 5/8 x 19 5/8 squares and the thickness is about 1/4 of an inch including the design. The square footage of each tile is about 2.69 sq.ft.
What are the dimensions of your Styrofoam Ceiling Tiles?
Styrofoam Ceiling Tiles are 19 5/8 x 19 5/8 squares and the thickness is about 1/4 of an inch including the design. The square footage of each tile is about 2.69 sq.ft.
How much do Styrofoam ceiling tiles weigh?
Our Styrofoam ceiling tiles, that are not painted weigh only about 1 oz each. So yes, they are very light and will not put much stress on the ceiling. Our hand painted Styrofoam ceiling tiles are only about 3 oz each and also very light.
Can I paint The Styrofoam Ceiling Tiles and what paint should I use?
Yes, you can paint our Styrofoam ceiling tiles but make sure that you are using a water-based paint only. Tiles can be brushed, rolled or sprayed with HVLP ( High Volume Low Pressure) sprayer. Again, remember not to use any spray cans or solvent based paints as they will dissolve your tiles.
Should I paint Styrofoam ceiling tiles before or after installation?
You can do it before or after installation and each method has its pros and cons. If you choose to paint your tiles before installation, keep in mind that you will need a fairly large area for your tiles to dry for at least couple of hours.
Also, if you are painting your tiles before installing them and the color is blue for example, unless your caulk is tinted to that specific color you will have to paint the caulk with a brush to match, after the tiles are up and the caulking is dry ( this process is not really hard at all, just make sure to mix the paint with little bit of water/ Floetrol so that it lays nicely and does not dry too quick and leaves brush marks). If you are painting the tiles after, make sure to caulk the seams and let the caulk dry for couple of hours at least.
Do I need to prime Styrofoam ceiling tiles?
Priming is always better but from my experience it is not required in most cases. It is a good idea to prime especially if you are going to be using metallic paints, such as silver, gold, platinum and so on. But if you are painting simply white, two top coats should do it.
Do I have to caulk the seams between Styrofoam ceiling tiles?
Yes, if you want to keep moisture from getting behind the tiles and for best aesthetic results.
Can Styrofoam ceiling tiles be used for a bathroom or a kitchen?
Yes, just make sure to caulk the seams and paint the tiles to seal it so that the moisture can not get behind them.
Can I cover popcorn ceiling with Styrofoam ceiling tiles?
Yes, but be careful about two things.
- Make sure that your popcorn ceiling is stable. If you touch it and it starts falling down, it will not work and it has to be scraped off the ceiling.
- Check for Asbestos. Find more details on this topic on our How to Cover a Popcorn Ceiling Page.
What type of glue should I use for Styrofoam ceiling tiles?
Instant Grab #310 works really well if you are using painted or going to paint your tiles, if you use it on plain white tiles it may show through.
Power Grab that dries clear works better on plain white tiles because it will not show through.
Do I need special equipment to cut the tiles?
No, tiles can be cut with scissors or with a straightedge and razor-knife.
How do I know how many tiles to order?
What tools will I need to install Styrofoam ceiling tiles?
Measuring Tape, Razor Knife (couple of blades), Pencil, Straightedge, Screwdrivers or a Screw Gun (for taking lights & vents down), Ladder, Chalk Box and Caulking Gun. Link to a step by step Instructional Video on How to Install Styrofoam Ceiling Tiles.
How do I install Styrofoam ceiling tiles around lights, vents and fans?
Most of the time it works like this. Before you start installing your tiles, lights, fans and vents get removed. After you remove the light and fans (make sure your power is off), cover the wires with proper covers and push them deep into the housing.
Once the wires are deep in the housing, you can install your tile over the wire housing and then just feel out the hole above it and use your razor knife to cut around it. Vents are are same, just make sure to turn your air conditioning or heating off so that you can install your tiles.
How do I finish Styrofoam ceiling tiles where they meet the wall?
You can do it couple of different ways.
- Just cut and install the last tile and caulk the seam. (This option is not ideal and would not be recommended)
- We offer a Plain Filler Tile that you can use as a border around the perimeter of the room so that you don't need to cut into the design (the tile can be used on its own).
Either way you decide to go, using the filler tile or not, to completely finish the ceiling, you need to use crown molding. We offer beautiful Styrofoam Crown Molding...
Do I have to install Crown Molding before or after installing Styrofoam ceiling tiles?
You can actually do it both ways. So, if you have a Crown Molding installed already or want to install it before the tiles, here is what you should know:
- It will take you about the same time to install the full tiles as it will take you to measure and cut to fit the perimeter tiles if you install the crown molding before the tiles.
- You do not need to caulk the top of the crown molding until you install the tiles.
If you decide to go the other route and install the crown molding after you should consider this:
- It is much faster to cut the perimeter tiles if you do not have to measure them exactly as it is in the case of installing the Crown Molding before.
- Depending on the design of your tiles, large gaps may be created after you install the Crown molding over the tiles.This will mean that caulking will take you longer and you may have to re-caulk as caulk does shrink.
Can Styrofoam ceiling tiles be nailed or stapled?
No, they can not be nailed nor stapled, Styrofoam ceiling tiles should be only glued for best results. However, people have reported using double sided tape, push pins screws and so on, however this is not recommended.
Are Styrofoam ceiling tiles fire-rated?
No, they are not fire-rated.
Can I use Styrofoam ceiling tiles on my wall?
Yes, you can install them on your wall but I would not recommend installing them in an area that will most likely get touched, kicked or it is a high traffic area. The reason is that the tiles are soft and can get damaged when kicked or hit, even with your nails they can be damaged.
So, it can work but they may get damaged. They should be fine as a wall art, few feet from the ground or on a wall where there is no traffic. Lot of Photographers use them for backgrounds.
Can I temporarily attach the Styrofoam ceiling tiles to the ceiling?
Without damaging the ceiling and the tiles I have no advice to offer. Some of our clients tried Double Sticking Tapes, Velcro, Pins as they were renting and the ceiling would have a popcorn ceiling that they could not stand.
Problem is that a lot of times, apartment have concrete ceilings and if it also has a popcorn ceiling, you can not use none of the applications listed in this question.
Is there a minimum order for the Styrofoam ceiling tiles?
No, you can order as little as one tile.
Do Styrofoam ceiling tiles add insulation?
Yes, they add little some insulation value.
What are the Faux Tin Ceiling Tiles made of?
Faux Tin Ceiling Tiles are made of PVC.
What are the dimension of Faux Tin Ceiling Tiles?
Our Faux Tin Ceiling Tiles are 2ft x 2ft. Drop in Faux Tin Ceiling Tiles Are about 23 3/4 x 23 3/4. Glue up Faux Tin Ceiling Tiles could be little bigger than 24x24, some designs could be about 24 3/8 x 24 3/8 including the overlapping edge. The depth on the design varies from one design to another. Our deepest tiles are the design 210, they are about 1 inch deep.
Are the Faux Tin Ceiling Tiles 3-D?
Oh yes! Our tiles are very 3-D and that is what makes them so beautiful, its the crisp 3-D designs.
Are the Faux Tin Ceiling Tiles painted or is it a solid color through out?
They are spray painted. Two tone finishes, such as Antique Copper are finalized by hand.
Can the Faux Tin Ceiling Tiles be painted?
Yes, they can be painted but since the design may be very deep a spray paint is the option. These tiles can be painted with majorityof paints including spray cans, but the recommended ones would be paints for plastic.
What can be the Faux Tin Ceiling Tiles cut with?
Good pair of regular Scissors.
How can the Faux Tin Ceiling Tiles be installed?
All the Faux Tin Ceiling Tiles are made from the same material but the tiles with large (24 inch) patterns can support their own weight in the grid system. So one way to install the in the grid system by simply dropping (video) them in.
The same tiles you can also glued up (video) but we do have tiles that can be only glued up to the ceiling and those are our Faux Tin Glue Up Ceiling Tiles. (Any Faux Tin Tile that the pattern smaller than 24 inch)
What kind of adhesive should be used for Faux Tin Ceiling Tiles?
Consider using our 310 Instant Grab adhesive or equivalent to it, such as power grab from loctite. Make sure the surface is clean by wiping all the dust and/or dirt.
What is the weight of the Faux Tin Ceiling Tiles?
The weight is about 8 oz for each 2x2 tile.
Do I have to use a filler/boarder with Faux Tin Ceiling Tiles?
No, it is not necessary but you certainly can if you preffer the look. There is a video that explains your options.
Where are the Faux Tin Ceiling Tiles made?
They are made in India and some of them are made in China.
What are the metal ceiling tiles made of?
We offer 3 different materials.
- Tin Plated Steel ( this is the authentic, historically correct material. We offer it in its raw form as well as painted. In the raw form it is the most economical option. It has to be painted from both sides if you get it un-finished.)
- Aluminum ( this is the popular material because it will not rust. It may however oxidize if you purchase our Mill Finish Aluminum depending on the environment you use it in. To prevent that you need to paint the face of the tile or choose on of the many finishes.
- Actual Solid Copper (this is the high end item that most wish they could have. All of our metal designs are available in this material. Although we do not have images for all of the products in copper, we do have a page dedicated to it. Here it is: Copper Ceiling Tiles
What are the dimension of metal ceiling tiles?
Most of our real metal ceiling tiles come in either 24" x 24" size or 24" x 48". The actual sizes slightly differs depending on the application. If you choose a tile for a suspended ceiling system also known as drop ceiling or a grid system, it will be slightly smaller than 24" x 24" size and 24" x 48", the actual size would be close to 23 7/8" x 23 7/8" and 23 7/8" x 47 7/8".
If you go with a nail-up install option, the tiles are 24 3/8 x 24 3/8 inches or 24 3/8 x 48 3/8 inches. There are couple of odd sizes and we can also create custom tiles with a custom size.
Are metal ceiling tiles 3-D?
Yes, our metal tiles, just like the old fashioned tin are stamped out to create 3-dimensional designs. The depth of the tiles vary based on the design from 1/8" - about 3"
Are metal ceiling tiles painted?
We offer them in both versions, painted and unpainted when it comes to Steel and Aluminum, here are some beautiful color options for the Aluminum ceiling tiles. When it comes to copper, we offer it either natural or we age it and can offer a clear coat to protect the surface from aging further.
Can metal ceiling tiles be painted?
Yes, absolutely. However, we offer many colors from basic single colors that can be powder coated to artisan finishes done by an artist by hand.
What can be metal ceiling tiles cut with?
We like to recommend tin snips as they are most accessible.
How can metal ceiling tiles be installed?
We recommend 2 types of installation method for real metal and those are nail-up to a substrate such as plywood or furring strips or drop-in installation into a grid system. Some people also glue their tiles, the best one for gluing would be Aluminum as it is the lightest of the metals.
What kind of adhesive should be used for metal ceiling tiles?
If you do decide to nail up our tiles, consider using our 310 Instant Grab adhesive or equivalent to it, such as power grab from loctite. Make sure the surface is clean by wiping all the dust and/or dirt.
What is the weight of metal ceiling tiles?
This would depend on the size and metal you choose. Our lightest metal tile is Aluminum which comes in at about 0.75lb per, the steel/tin is about 1.5lb and copper 3lb 24"x24" tile.
Which metal tiles come in 2 ft x 4 ft / 24 in x 48 in?
We do have several designs that come in 2 ft x 4 ft/ 24 inches x 48 inches. Here they are: Metal Ceiling Tiles - 24x48.
Do you sell Metallaire and Metalworks Tin by Armstrong?
No, however, we offer similar patterns, sizes, and colors under our tin ceiling tiles collection. Feel free to reach out to our sales team to find comparable product at 866-297-0380.
By Brand
- MirroFlex
- EKENA Urethane Millwork
- Fusion
- NuMetal
- LumiSplash
Can I customize MirroFlex with my own design or a custom color?
Due to the manufacturing process, custom designs and colors are subject to a minimum order quantity. Feel free to reach out to our sales team
Are the seams between MirroFlex panels and Glue-Up ceiling tiles visible?
MirroFlex panels and Glue-Up ceiling tiles with the BIO (Built In Overlap) feature are designed to create a virtually seamless appearance and simplified installation.
How do you cut MirroFlex?
You can easily cut MirroFlex with scissors or a utility knife. Just measure and mark a straight line first. If you're using a utility knife, score the front side of the MirroFlex and then snap it apart instead of cutting all the way through.
What is "cut-to-size?"
We can customize the product to your specific dimensions for an additional charge. Please be aware of the applicable tolerances.
How does MirroFlex ship?
We go the extra mile to ship your products safely. We have partnered with packaging specialists to design custom containers for each product, making sure they arrive in perfect condition.
What is the heat resistance of MirroFlex? Can I use it in my kitchen?
MirroFlex, a heat-resistant decorative laminate, can withstand temperatures up to 140°F (60°C), making it suitable for kitchens and other environments with moderate heat exposure. However, direct flame or prolonged exposure to extreme heat is not recommended. Avoid exposing MirroFlex to excessive heat for extended periods.
What types of substrates can MirroFlex be applied to?
MirroFlex can be stuck on wood, metal, glass, plastic, and drywall. But make sure the surface is smooth, clean, and dry first. Use the right glue for the substrate.
How do you determine fire, impact, and stain resistance?
We entrust independent testing laboratories to thoroughly evaluate the technical properties of MirroFlex.
Are MirroFlex Ceiling Tiles waterproof?
MirroFlex ceiling tiles are easy to clean and don't absorb water.They meet or exceed the food safety requirements set by the USDA, state health departments, and the FDA.These organizations don't recommend specific products, but they do provide guidelines for ceiling tiles in food preparation areas and its important to follow these guidelines before installing any ceiling tiles in a food preparation area.
How are urethane products made?
Polyurethane is formed when two chemicals react creating a foamlike structure. When this reaction occurs in one of product preprimed molds, the urethane foams, expands to the desired shape, and hardens. This reaction creates tremendous heat, causing the primer on the mold to fuse to the material, forming a hard, outer shell. A high-density product with crisp detail is then released from the mold.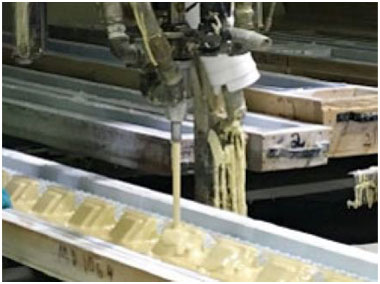
Will these products melt in high temperatures?
All products, including wood and steel, will melt if the temperature is hot enough. However, urethane products will not melt under normal use conditions.
What types of special skills are needed to install urethane products?
None. If you can install wood products, you can easily install urethane products. They can be nailed, cut and sanded just like wood products.
Are special supplies needed to install polyurethane products?
Yes. We recommend using noncorrosive fasteners along with polyurethane compatible adhesive. The adhesive is recommended to place between decorative joints and to secure any piece to the wall along with mechanical fasteners.
What are some general tips about installing urethane products?
Never install products with fasteners only. For best results, always use noncorrosive fasteners along with polyurethane compatible adhesive on the back and at all decorative joints.
What types of weather conditions are necessary to install exterior urethane products?
For exterior applications, urethane products can be installed in any temperature, hot or cold, and in any kind of weather.
What type of maintenance is needed to keep urethane products looking good?
Very little, if painted with recommended quality exterior-grade latex paint. All urethane products are low maintenance millwork goods, making them ideal for both interior and exterior applications.
Will the product ever become infested with insects?
No, urethane products are not a source of food for insects as it is not made from wood.
Are urethane products affected by moisture?
No. Urethane does not absorb water as it is a closed-cell material. This closed-cell structure will prevent water absorption.
Why or how do people use urethane millwork?
Urethane is lightweight and easy to install, making it a top selection of both building professionals and consumers. Lightweight for quick and easy installation. Solid urethane offers maximum durability and minimal upkeep with sharp design clarity and high quality, pattern options. It can be cut, drilled, glued or screwed with common tools and comes factory primed and ready for paint or faux finish. Best of all it is resistant to moisture, insects, and peeling or splitting.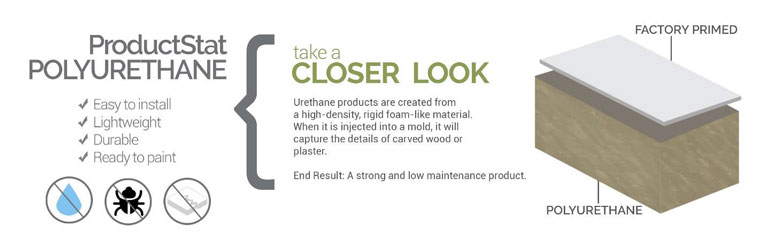
Do all urethane products come painted and ready to install?
The pre-primed surface is ready to stain or paint. Urethane products need to be painted. We recommend painting the product before installation and touching it up after installation is completed. Exterior product must be painted with an exterior grade 100% acrylic latex paint.
What kind of paint do I use after installation?
100% acrylic latex paint. Since all polyurethane products are subject to thermal expansion and contraction, it is recommended that consideration to lighter paints be selected in your choice of colors, as darker colors absorb more radiation from the sun than lighter colors. Flat, eggshell and satin finishes are recommended due to their slight porous nature during the curing process.
What are its best uses for the building industry?
Due to the ability to mold the material, decorative trims with detailed designs are easy to produce. Large moulding profiles can be made from one piece of urethane, instead of layering wood to create the same look. This saves on labor and time.
How do I prevent UV fading/deterioration?
UV rays do not affect properly finished product. Exterior product must be painted with an exterior grade 100% acrylic latex paint.
Anything special I should know about storing urethane products?
These products can be stored either inside or outside, but not in extreme heat. Products should be stored as it is intended to be installed. For optimum use, polyurethane compatible adhesive should be stored at room temperature until ready to use. Acclimate urethane products before installation up to 10 hours.
What are the recommended fastening procedures for urethane?
Please see installation instructions for part specific recommended fastening procedures. Note that products should never be installed with fasteners that are susceptible to corrosion, and proper use of glue and adhesives is crucial for correct installation.
Are your urethane products just decorative?
Polyurethane products are most commonly used for decorative purposes as the material by itself is non-structural. Even so, many polyurethane items do serve a functional purpose, like gable vents that help with attic ventilation or ceiling medallions that cover unsightly holes in the ceiling.
I want to submit my own photo(s)/art file(s), what size and resolution should it/they be?
For optimal results, we recommend using a high-resolution image with a native resolution of at least 300 ppi. However, if your image is lower than 300 ppi, please send it to us and we will assess its suitability for your desired application. Depending on the substrate and intended use, you may still be satisfied with the outcome even if the image resolution is not ideal. Our fusion process can be quite forgiving, and we have successfully worked with low-resolution images in the past.
My photo might need some "Photoshopping" . Can you guys do that?
Yes, we offer image enhancement services to improve the quality of your photos for your project with an additional charge. Please note that higher resolution doesn't always guarantee better quality. For instance, photos taken in low light often contain noise, making them more challenging to enhance compared to well-shot photos with lower resolution.
What file formats do you accept?
We accept both raster and vector image formats. Raster images, such as PSD, TIFF, and JPG, are resolution-dependent, meaning their quality decreases as they are enlarged. For instance, a 300 PPI photo enlarged to 200% would become 150 PPI, reducing the resolution by half. Vector images, such as AI, EPS, and PDF, are resolution-independent, meaning they can be enlarged to any size without losing quality.
Does my file need to have bleeds?
If your artwork extends to the edge of your printed piece, you'll need to add bleeds. Bleeds are extra margins that ensure no unprinted edges are visible after trimming. To add bleeds, extend your artwork an additional 0.125 inches (1/8th inch) beyond the final size in all directions. If you're unsure whether your artwork needs bleeds, give us a call, and our experts will be happy to assist you.
Should my files be RGB or CMYK?
RGB has a wider range of colors and produces more vibrant prints. CMYK is only necessary for images that will be printed using a specific printing method called offset printing.
I want to color match an existing item that I have. Can you guys color match?
To ensure accurate PMS color matching, please provide us with the specific Pantone number. We will then carefully calibrate the printing process to achieve the closest possible match.
My photo/art file has text, what size should the font be?
To ensure optimal readability and avoid font conversion issues, please use a minimum font size of 12 points. Certain fonts may require a larger size or bolding, particularly for reverse copy applications. Submit fonts as outlines to eliminate conversion-related problems.
How do I know what substrate to use for my project?
Have your ideal substrate in mind? That's fantastic! If not, let's discuss your project requirements and discover the most suitable option for you. Select a substrate that aligns with your desired aesthetic and tactile experience. Substrate selection significantly impacts image quality and overall project appeal. We're here to guide you towards the perfect choice.
How should I store my Fusion project before installation?
Lay the material flat and let it adapt to the surrounding environment for at least 24 hours before processing.
What sizes are available?
The size of your printed material is determined by the substrate you choose and the printing technology used. In general, all stock substrates are available as 4' x 8' panels. Sublimation printing allows for 5' x 10' nominal printing, while digital printing can print at 5' width and virtually unlimited length. Other options may be available, so please call our sales representative for details at 866-297-0380.
What is NuMetal?
NuMetal is a range of high-pressure laminates (HPLs) featuring a thin metal surface bonded to a phenolic paper backing. These durable HPLs are ideal for interior applications such as wall coverings, wall panels, and ceilings.
What is phenolic paper backing?
Phenolic paper backing is a type of backing material used in the manufacture of high-pressure laminates (HPLs). It is made by impregnating layers of kraft paper with phenolic resin and then curing the material under high heat and pressure. This process creates a dense, strong, and durable backing that is resistant to moisture, heat, and chemicals.
Is phenolic paper backed metal better than unbacked metal?
Phenolic paper-backed metal offers several advantages over unbacked alternatives. The phenolic paper backing safeguards the laminate from dents and damage during shipping and fabrication (though it does not confer complete immunity to damage, so careful handling remains essential). Additionally, phenolic paper-backed metal is gentler on router bits and saw blades, extending the lifespan of these tools for fabricators.
What is the difference between NuMetal and other similar, competitive metal lines?
The primary distinction lies in the NuMetal line's broader selection and variety of products. While our competitors concentrate on traditional melamine HPLs, we exclusively cater to the metal market. The manufacturing process and standard tools remain the same for all phenolic paper-backed HPLs. A more significant difference arises when comparing NuMetal products to unbacked metals, many of which lack phenolic paper backing. This absence makes fabrication more challenging and places additional strain on fabricators' tools.
How can NuMetal be used in my project?
NuMetal is ideally suited for a wide range of vertical and light-duty horizontal applications. This versatile material can be used for wall and ceiling claddings, doors and frames, furniture, light-duty horizontal surfaces, and displays.
How is NuMetal fabricated?
NuMetal fabrication utilizes the same tools and techniques employed for standard high-pressure decorative laminates. It adheres seamlessly to various substrates commonly used in the industry. However, extra caution is necessary to prevent surface denting with tools or scratching from metal particles. Carbide-tipped blades and bits are highly recommended, as dull blades can generate excessive heat and cause metal scorch.
How can NuMetal be shipped?
NuMetal shipping methods vary based on pattern and order size. Options include truck delivery, wooden crates, or rolled shipments for courier services. Upon receiving NuMetal, promptly remove it from the container and store it flat to minimize roll set formation.
Is there any special treatment required before or after fabrication to ensure longevity of the product?
Anodization gives NuMetal a hard, tarnish-proof surface with aluminum's high abrasion resistance. All products have a clear, peel-off protective mask to keep the finish intact. Leave the mask on during fabrication to prevent scratches.
Is the lacquer compatible with other systems?
Brushed NuMetal, Copper, and Unique Art laminates feature a cellulose-based lacquer coating. This lacquer seamlessly integrates with other lacquer systems, enabling further finishing if desired.
What type of adhesive is recommended?
For NuMetal adhesive, utilize any contact cement or cold-set adhesive typically employed for decorative laminates. Refrain from applying or allowing adhesive to dry on the metallic surface. For adhesive cleanup, STRICTLY use naphtha or benzene. Avoid lacquer solvents and other adhesive solvents, as they can damage lacquer coatings.
How should NuMetal be stored?
Store NuMetal sheets flat to prevent warping. Avoid storing them on edge, as this can cause the sheets to bow over time. Keep metal laminates face up in a cool, dry environment and on a fully supportive, flat surface. Utilize a top sheet of chipboard or similar material to maintain the flatness of stored sheets.
How should NuMetal be cleaned?
Ensure the chosen cleaning agent is compatible with either anodized or lacquered NuMetal products before use. Clean surfaces using a soft cloth and a mild household cleaner, such as waxes, Windex-type solutions, or ordinary soap and water. Apply automobile wax to enhance protection for all metal laminate surfaces.
Are there any precautions to consider when handling the product?
Metal laminates can conduct electricity and cause electrical hazards if not properly grounded. This product is high-quality laminated aluminum, copper, or stainless steel. Some surface imperfections are normal. PLEASE CHECK THE MATERIAL CAREFULLY BEFORE USING to make sure it's right for you.
Is counter balancing necessary?
To prevent warping in wallcoverings, wall panels, ceilings, and other surfaces, counter-balancing is crucial for High Pressure Laminates, as it is for other types of laminates.
Do you offer a real metal product that doesn't require counter balancing?
Our Fusion program introduces the Artful Metals Collection, featuring distinctive metal and patina-inspired finishes. These finishes are accessible across a diverse selection of 4' x 8' Fusion metal substrates, eliminating the need for counterbalancing. Please note that special orders for the 4' x 10' size are subject to minimum order requirements.
How about size and thickness?
The thickness measures approximately .035", except for Unique Art and stainless steel, which are .040" thick. Anodization is applied to polished aluminum surfaces, while lacquer coats brushed aluminum and copper surfaces. Generally, NuMetal sheets come in 4’ x 8’ dimensions, with 4’ x 10’ sheets offered in specific designs.
Does DCT stock any commodity-type HPLs?
What size and resolution should my photo(s)/art file(s) be for submission?
For best results, submit your photo or art file in full size at its original resolution (ideally 300 DPI, minimum 150 DPI). If you don't have these sizes, don't worry – send us what you have! We'll assess it and see if it works for your project. Remember, the final print quality depends on both the file size and the material used. We've often achieved great results even with files below standard resolutions, so don't hesitate to send us what you've got!
Is it possible for you to perform some "Photoshopping" on my photo if needed?
Certainly, we offer image enhancement services using Photoshop to optimize them for your project, and there is an extra charge for this service. It's important to note that higher resolution doesn't always guarantee better quality. For instance, when a photo is taken in low light, digital cameras can introduce "noise" in the form of random speckles of off-color where none should be present. Fixing and enhancing a well-shot lower resolution photo is generally more straightforward than addressing issues in a poorly shot high-resolution photo.
What file formats do you accept?
We welcome both raster and vector image formats. Among the raster formats accepted are PSD (Photoshop), TIFF, and JPG. It's important to note that these file formats are resolution-dependent, meaning that as you increase their size, the resolution decreases. For instance, scaling up a 300 DPI photo to 200% would result in a resolution of 150 DPI—doubling the size equals halving the resolution. On the other hand, common vector formats like AI (Adobe Illustrator), EPS, and PDF are typically created by artists and can be safely enlarged to almost any size without any loss of resolution.
Does my art file need to have bleeds?
If colors, images, or graphic elements extend to the edge of the final product in your document, bleeds are required. Ensure the artwork extends by .125" (1/8th inch) beyond the final size in all directions for proper bleeds. If you're unsure whether your image needs bleeds, feel free to contact us, and a specialist will provide guidance on your project.
Is it preferable to use RGB or CMYK for my files?
RGB is known for its extensive color range and superior print results. However, the conversion to CMYK is primarily recommended for images intended for halftone processes like offset printing. If you're seeking to match the color of an existing item, we can assist with PMS color matches. Just share the Pantone umber with us, and we'll make our best effort to closely approximate the color for you.
What font size is recommended for the text in my photo/file?
The recommended minimum font size is 12 points. Certain fonts may necessitate a larger point size or bolding, particularly for reverse copy. To prevent type conversion issues, kindly supply the type as "outlines." Please be aware that, due to the vast variety of fonts available, we may not have the requested font in our collection.