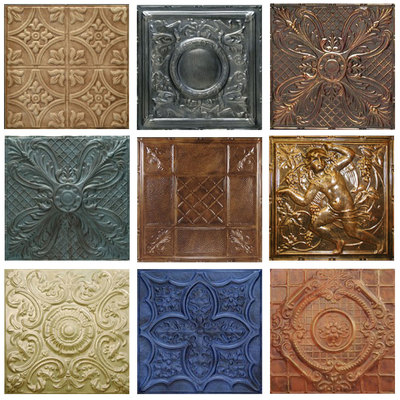
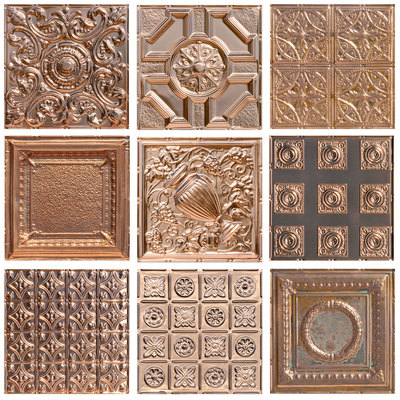
Our metal backsplashes are not only a low maintenance option for your kitchen – they can be installed in a fraction of the time many other materials require. A ceramic tile backsplash normally requires at least two days for installation and sometimes longer, but you can glue or nail a tin backsplash into place and have it ready for use in about four hours – just follow these easy instructions:
Tools You’ll Need
- Tape Measure
- Pencil
- Level – a two foot or smaller level works best
- Caulk Gun
- Liquid Nails 601 for Projects or a latex based ceramic tile adhesive
- Cotton Gloves
- Guillotine Cutter or tin snips
- Silicone Caulk
You may also find the following tools helpful: T-square, trowel, brad gun, cordless or electric drill, driver bit, 1/32 inch pilot hole bit, authentic cone head nails
Liquid Nails is a registered trademark of ICI (Imperial Chemical Industries PLC)
Step 1 – Surface Preparation
The recommended installation method for Decorative Ceiling Tiles’ tin backsplash panels is to apply a layer of plywood on your kitchen walls prior to starting the tile installation. However, if your existing wall surface is flat, free of any flaking or chipping, and clean enough to accept adhesive, you may be able to eliminate the plywood application.
Choose a starting point for your first tile – lining up the outside edge of a tile with the end of your wall and base cabinets can be a good place to begin or you may want to start in a corner. Place a small mark on the wall at the tile edge and then use your level to draw a plum vertical line. This will be the edge of your first tile.
Step 2 – Tin Backsplash Panel Installation
Coat the rear of the first panel with adhesive. If you are applying the backsplash over an existing surface, the Liquid Nails 601 for Projects is often the best choice, but if installing over new plywood, you may want to use a latex based ceramic tile adhesive.
Tin can dent very easily so if you’re installing a panel with an embossed design, take care to spread enough adhesive on the rear to fill any crevices in the panel. While the adhesive is soft and pliable, press the first panel into place taking care to distribute the glue evenly and into all crevices. Repeat the process on subsequent tiles as the adhesive will hold each in place when pressed against the wall.
Note that each tile overlaps the preceding tile by about 3/8 inch. As each overlapping tin backsplash panel is installed, use a clean non-abrasive cloth to wipe away any excess glue that is squeezed out at the joints before it hardens. Continue installing tiles until the area receiving the backsplash is complete.
Remember to allow for overlapping when cutting out for switches and electrical outlets.


Are you looking for an installer in your area that can help you install our metal backsplash? Try to search in our installers network.
Available Sample Packs

Ceiling Tiles
- Tin Tiles
- 2 x 2 Ceiling Tiles
- Beam Wood
- Ceiling Tiles 24x48
- 2 x 4 Ceiling Tiles
- Drop Ceiling Tile
- White Tin Ceiling Tiles
- Bead Board Ceilings
- Glue Up Ceiling Tiles
- Black Ceiling
- Industrial Ceiling Tiles
- Plastic Ceiling Tiles
- Ceiling Tile Ideas
- What Can I Use to Cover Up My Ceiling
- Ceiling Tiles to Reduce Noise
Wall Panels
- Leather Wall Panels
- Acrylic Wall Panels Decorative
- Rustic Corrugated Metal Panels
- Shower Wall Panel
- Faux Rock Siding Panels
- Stainless Steel Diamond Plate
- Panelling 4x8
- 3D Panels
- Decorative Panels
- Tin Backsplash Kitchen
- White Brick Panelling
- Wall Stone Panels
- Beadboard Wall Paneling
- Faux Stone Siding
- Faux Concrete Panels
Moldings
- Decorative Wall Molding Panels
- Crown Molding Outside Corner
- Crown Moldings for Ceilings
- Baseboards for Ceiling
- Crown Molding Corner Blocks
- Dentil Crown Molding
- Polystyrene Crown Molding
- 2 1/4" Crown Molding
- Metal Trim
- Led Crown Molding
- Corner Block Moulding
- Best Crown Molding for Low Ceilings
- Crown Molding for Vaulted Ceiling
- Crown Molding Mantel
- 6" Baseboard
- Modern Flat Crown Molding