Are you ready to break up the bareness of your drab ceilings with faux wood beams?. Here’s are some step-by-step instructions on how to install your new faux ceiling beams.
Below the brief instructions, you will find a helpful video to follow to make the process go smoothly. The steps and video will be able to help out anyone asking: "how are faux beams installed?"
To get started with your ceiling beam installation, gather a few tools you may find handy, including a hand saw, drill, tape measure, and pencil or marker.
- Start with clean, sound substrate. Figure out the desired layout for all decorative ceiling beams. Measure and mark the inside dimension of each beam on the ceiling at each end and one mark in the center of the room. Chalk lines for each inside dimension of the decorative beam or pencil a line using a long straight edge.

(Measuring the inside of the beam to determine the distance between outside edges of the 2x2 strips)

(Using the inside beam measurements, 2 parallel guide lines are marked on the ceiling for the strips to installed on.)
- Using a 3/32” drill bit, pre-drill holes 24” on center through the 2” x 2” KD nailing strips. Place nailing strip on the inside of the chalk line and re-drill through each hole to mark the spot to accept the drywall anchor. Pull the nailing strip down and screw in the drywall anchors. Apply a ¼” continuous bead of PL Premium® Polyurethane Construction Adhesive to the back side of the nailing strip.
- Place the nailing strip back on the ceiling and attach with 3-1/8” GRK R4 #9 multipurpose screws that screw into the drywall anchors. 2” x 6” (minimum length of 12”) KD wood blocks are also approved for the installation of beams. They should be spaced 36” on center at a minimum. Pre-drill 2 holes (4 holes for larger beams) in each block and use the same application technique for the nailing strips.

(Pre-drilling holes into the wooden strips. These will be used re-drill into the ceiling)

(Drilling through pre-drilled holes into the ceiling )

(Making the hole big enough for the butterfly anchor)

(Pushing the butterfly anchor thought the hole to hold the strips in place)

(Tightening the anchor using a screw-gun)
- Measure the distance on the ceiling for the beam to be cut. We recommend that a ¼” is added to the length cut. A miter power saw or a Japanese hand saw are our first choices to cut these beams. Most walls are not square and the beam can always be sanded or shaved to the exact size.

(Marking lines using a speed square to assure a straight line)

(Ron Hazelton is cutting a faux wood beam using Japanesesaw.)

(Sanding block is used to take of excess for a snug fit)
Pro tips:
- Most beams from the factory are not square at each end. Square up one end then measure and mark for length. Using a framing square, draw a line on the 3 sides of the beam to be cut. Use a standard wood hand saw and slowly cut through the beam. If the beam was fabricated – watch for the screws that were used to manufacture the beam.
- Dry fit beam in place over 2 x 2 wooden strips material before applying adhesive to make sure it fits well.
- Pull beam back down and apply adhesive to the sides of the 2” x 2” nailing strip or 2x blocking.

- Reinstall beam and fasten with GRK #9 Kameleon finish screws 24” on center (minimum) and embed the screw 1/16” – 1/8” below the surface of the beam. An air powered finish nailer with finish nails is also acceptable if the beam is 2 lbs per L/F.

(Placing beam over the strips with adhesive already applied to them)

(Fastening the beam with screws)

(Filling the screw hole with a putty)
Below are videos recommended you watch to see more details on how to install faux wood beams.
Tools and Supplies You'll Need To Install Faux Wood Beams
This project requires 2 or more people depending on the lengths of the beams.
- Ladders
- Measuring Tape
- Saw (Miter saw or Japanese saw is our choice)
- Chalk line
- Pencil or a marker
- Speed square
- Drill bits for wood and paddle bits
- 2x2 wood strips
- Toggle bolts
- PL Premium adhesive & Caulking gun to dispense the adhesive
- Decking screws
- Saw horses
Installation videos
In the video below Ron Hazelton shows step by step how to install faux wood beams explaining all the details including adding decorative faux iron for straps, bolts and hangers.
Here are 5 tips to help with your Faux Beam installation:
- Measure twice, cut once!
- accurately measuring your faux beams before cutting and installing them will save a lot of headaches and help to create a seamless finish.
- Carefully locate your ceiling joists
- For extra stability for when installing your faux wood beams, secure your beams to the existing joists in your ceiling.
- Use lightweight backing when mounting to a drywall
- If you’re installation requires mounting your faux beams to a drywall, for extra support, use cleats or wood blocks
- Pre-drill holes
- There’s always a risk of cracking or splitting the beams if you’re faux beams when screwing into them or adding fixtures. To help prevent this, pre-drill the holes first.
- Create a seamless finish
- Once you’ve finished with the faux ceiling beam installation, use a wood filler or caulk to conceal and hide any gaps, cracks or seams.
Faux Ceiling Beam Installation FAQs
It's not always required, but absolutely recommended so that once you've installed your faux beams, they'll stay in place and won't impact the position of anything else on your ceiling too.
Wherever you can, you should install your faux beams to a structural component, but as they’re lightweight, it is sometimes avoidable. If you're not quite sure about whether or not your ceiling can support the faux beam installation without being attached to joists, we recommend that you hire a builder or qualified tradesperson to advise you on this.
Yes, but it’s best to use wood cleats or blocking underneath for extra support, especially for longer or heavier beams.
Basic tools include a tape measure, stud finder, drill, screws, construction adhesive, a spirit level. If you're making custom cuts, you might also need a miter saw or something similar.
This is quite simple. Once you've finished installing the faux beams, you can use wood filler, caulk, or decorative beam straps to disguise seams or hide them.
It's possible to install faux ceiling beams by yourself, but as they can be heavy and long, we recommend that you get a handy friend or tradesperson to help.
Most faux beams come pre-finished, but if you don't want to paint them prior to installing or in a few years down the line, be sure to use high-quality stain or paint designed for the material. Your local paint supplier should be able to help with this or please feel free to contact our experts for help.
No, they're much lighter than they look. Our faux beams are made from lightweight materials, making them much less heavy and easier to handle than real timber beams.
Spacing depends on the room size and design preference, but a typical range is 4 to 6 feet apart to create a balanced look that's easy on the eye.
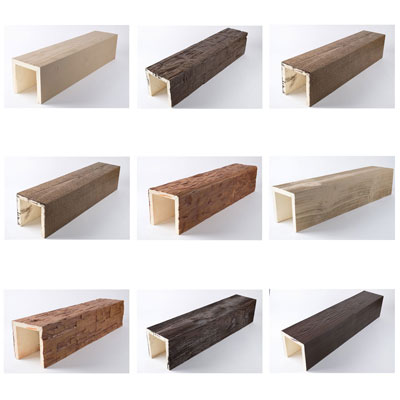
Available Sample Packs
Samples are available in 8x8x11 or in 4x4x1 size. We also offer an all finishes pack.

Ceiling Tiles
- Modern Decorative Ceiling Tiles
- Embossed Tiles
- Styrofoam Ceiling Tiles
- 24x24 Drop Ceiling Tiles
- 12x12 Tile Patterns
- Drop Ceiling Coffered
- Tin Ceiling Tile
- PVC Ceiling
- Drop Ceiling Tiles 2x4
- White Tile Ceiling
- Glue on Ceiling Tiles
- 48x24 Ceiling Tiles
- Styrofoam Ceiling Planks
- Wood Planks on Ceiling
- Wood Beam Ceiling
- Rustic Drop Ceiling Tiles
Wall Panels
Moldings
Popular Pages
- Sample Tiles
- Faux Beam Trusses
- Large Ceiling Medallions
- Ceiling Medallion 36
- 12 Inch Ceiling Medallion
- 30 Inch Ceiling Medallion
- Faux Beams in Kitchen
- Ceiling Medallions Victorian
- Faux Beams for Living Room
- Ekena Millwork Ceiling Medallion
- Drop Ceiling Grids
- Decorative Tiles
- Can Faux Wood Beams Be Painted
- Square Ceiling Medallions
- Ceiling Medallion Octagon
- Faux Beam Entryway