- Custom Tin Ceiling Tiles
- Styrofoam Ceiling Tiles
- Faux Tin Ceiling Tiles
- Metal Ceiling Tiles
- EKENA Urethane Millwork
- General Questions
- Returns
Custom Tin Ceiling Tiles and Replicas
-
Are you able to create a design from CAD drawing?
Yes
-
Can you replicate a tile from a sample?
Yes
-
Can you create a design from hand drawing?
Yes
-
Are you able to help us develop a design?
Yes
-
Do you have the ability to create custom sizes?
Yes
-
Can you create custom colors?
Yes
-
What are the costs involved?
This will depend on the material, size, depth and amount of the tiles you will need to create. We will gladly give you a quote, please submit your art and any details you have.
Styrofoam Ceiling Tiles
-
What are the dimensions of your Styrofoam Ceiling Tiles?
Styrofoam Ceiling Tiles are 19 5/8 x 19 5/8 squares and the thickness is about 1/4 of an inch including the design. The square footage of each tile is about 2.69 sq.ft.
-
How much do Styrofoam ceiling tiles weigh?
Our Styrofoam ceiling tiles, that are not painted weigh only about 1 oz each. So yes, they are very light and will not put much stress on the ceiling. Our hand painted Styrofoam ceiling tiles are only about 3 oz each and also very light.
-
Can I paint The Styrofoam Ceiling Tiles and what paint should I use?
Yes, you can paint our Styrofoam ceiling tiles but make sure that you are using a water-based paint only. Tiles can be brushed, rolled or sprayed with HVLP ( High Volume Low Pressure) sprayer. Again, remember not to use any spray cans or solvent based paints as they will dissolve your tiles.
-
Should I paint Styrofoam ceiling tiles before or after installation?
You can do it before or after installation and each method has its pros and cons. If you choose to paint your tiles before installation, keep in mind that you will need a fairly large area for your tiles to dry for at least couple of hours.
Also, if you are painting your tiles before installing them and the color is blue for example, unless your caulk is tinted to that specific color you will have to paint the caulk with a brush to match, after the tiles are up and the caulking is dry ( this process is not really hard at all, just make sure to mix the paint with little bit of water/ Floetrol so that it lays nicely and does not dry too quick and leaves brush marks). If you are painting the tiles after, make sure to caulk the seams and let the caulk dry for couple of hours at least.
-
Do I need to prime Styrofoam ceiling tiles?
Priming is always better but from my experience it is not required in most cases. It is a good idea to prime especially if you are going to be using metallic paints, such as silver, gold, platinum and so on. But if you are painting simply white, two top coats should do it.
-
Do I have to caulk the seams between Styrofoam ceiling tiles?
Yes, if you want to keep moisture from getting behind the tiles and for best aesthetic results.
-
Can Styrofoam ceiling tiles be used for a bathroom or a kitchen?
Yes, just make sure to caulk the seams and paint the tiles to seal it so that the moisture can not get behind them.
-
Can I cover popcorn ceiling with Styrofoam ceiling tiles?
Yes, but be careful about two things.
- Make sure that your popcorn ceiling is stable. If you touch it and it starts falling down, it will not work and it has to be scraped off the ceiling.
- Check for Asbestos. Find more details on this topic on our How to Cover a Popcorn Ceiling Page.
-
What type of glue should I use for Styrofoam ceiling tiles?
Instant Grab #310 by Akfix works really well if you are using painted or going to paint your tiles, if you use it on plain white tiles it may show through.
Power Grab that dries clear works better on plain white tiles because it will not show through. -
Do I need special equipment to cut the tiles?
No, tiles can be cut with scissors or with a straightedge and razor-knife.
- How do I know how many tiles to order?
-
What tools will I need to install Styrofoam ceiling tiles?
Measuring Tape, Razor Knife (couple of blades), Pencil, Straightedge, Screwdrivers or a Screw Gun (for taking lights & vents down), Ladder, Chalk Box and Caulking Gun. Link to a step by step Instructional Video on How to Install Styrofoam Ceiling Tiles.
-
How do I install Styrofoam ceiling tiles around lights, vents and fans?
Most of the time it works like this. Before you start installing your tiles, lights, fans and vents get removed. After you remove the light and fans(make sure your power is off), cover the wires with proper covers and push them deep into the housing.
Once the wires are deep in the housing, you can install your tile over the wire housing and then just feel out the hole above it and use your razor knife to cut around it. Vents are are same, just make sure to turn your air conditioning or heating off so that you can install your tiles.
-
How do I finish Styrofoam ceiling tiles where they meet the wall?
You can do it couple of different ways.
- Just cut and install the last tile and caulk the seam. (This option is not ideal and would not be recommended)
- We offer a Plain Filler Tile that you can use as a border around the perimeter of the room so that you don't need to cut into the design(the tile can be used on its own).
-
Do I have to install Crown Molding before or after installing Styrofoam ceiling tiles?
You can actually do it both ways. So, if you have a Crown Molding installed already or want to install it before the tiles, here is what you should know:
- It will take you about the same time to install the full tiles as it will take you to measure and cut to fit the perimeter tiles if you install the crown molding before the tiles.
- You do not need to caulk the top of the crown molding until you install the tiles.
- It is much faster to cut the perimeter tiles if you do not have to measure them exactly as it is in the case of installing the Crown Molding before.
- Depending on the design of your tiles, large gaps may be created after you install the Crown molding over the tiles.This will mean that caulking will take you longer and you may have to re-caulk as caulk does shrink.
-
Can Styrofoam ceiling tiles be nailed or stapled?
No, they can not be nailed nor stapled, Styrofoam ceiling tiles should be only glued for best results. However, people have reported using double sided tape, push pins screws and so on, however this is not recommended.
-
Are Styrofoam ceiling tiles fire-rated?
No, they are not fire-rated.
-
Can I use Styrofoam ceiling tiles on my wall?
Yes, you can install them on your wall but I would not recommend installing them in an area that will most likely get touched, kicked or it is a high traffic area. The reason is that the tiles are soft and can get damaged when kicked or hit, even with your nails they can be damaged.
So, it can work but they may get damaged. They should be fine as a wall art, few feet from the ground or on a wall where there is no traffic. Lot of Photographers use them for backgrounds.
-
Can I temporarily attach the Styrofoam ceiling tiles to the ceiling?
Without damaging the ceiling and the tiles I have no advice to offer. Some of our clients tried Double Sticking Tapes, Velcro, Pins as they were renting and the ceiling would have a popcorn ceiling that they could not stand.
Problem is that a lot of times, apartment have concrete ceilings and if it also has a popcorn ceiling, you can not use none of the applications listed in this question.
-
Is there a minimum order for the Styrofoam ceiling tiles?
No, you can order as little as one tile.
-
Do Styrofoam ceiling tiles add insulation?
Yes, they add little some insulation value.
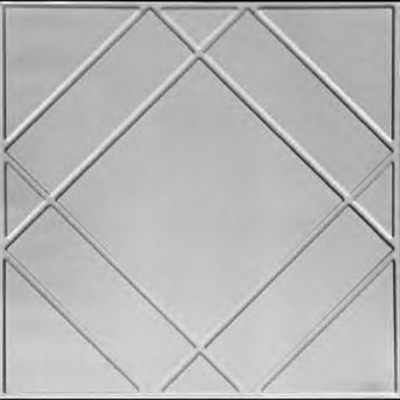
Faux Tin Ceiling Tiles
-
What are the Faux Tin Ceiling Tiles made of?
Faux Tin Ceiling Tiles are made of PVC.
-
What are the dimension of Faux Tin Ceiling Tiles?
Our Faux Tin Ceiling Tiles are 2ft x 2ft. Drop in Faux Tin Ceiling Tiles Are about 23 3/4 x 23 3/4. Glue up Faux Tin Ceiling Tiles could be little bigger than 24x24, some designs could be about 24 3/8 x 24 3/8 including the overlapping edge. The depth on the design varies from one design to another. Our deepest tiles are the design 210, they are about 1 inch deep.
-
Are the Faux Tin Ceiling Tiles 3-D?
Oh yes! Our tiles are very 3-D and that is what makes them so beautiful, its the crisp 3-D designs.
-
Are the Faux Tin Ceiling Tiles painted or is it a solid color through out?
They are spray painted. Two tone finishes, such as Antique Copper are finalized by hand.
-
Can the Faux Tin Ceiling Tiles be painted?
Yes, they can be painted but since the design may be very deep a spray paint is the option. These tiles can be painted with majorityof paints including spray cans, but the recommended ones would be paints for plastic.
-
What can be the Faux Tin Ceiling Tiles cut with?
Good pair of regular Scissors.
-
How can the Faux Tin Ceiling Tiles be installed?
All the Faux Tin Ceiling Tiles are made from the same material but the tiles with large (24 inch) patterns can support their own weight in the grid system. So one way to install the in the grid system by simply dropping (video) them in.
The same tiles you can also glued up (video) but we do have tiles that can be only glued up to the ceiling and those are our Faux Tin Glue Up Ceiling Tiles. (Any Faux Tin Tile that the pattern smaller than 24 inch)
-
What kind of adhesive should be used for Faux Tin Ceiling Tiles?
Contact cement from DAP Weldwood - Original Formula is the one we have always used but our clients have tried Liquid Nails and Fast Grip and say that they are easier to use.
-
What is the weight of the Faux Tin Ceiling Tiles?
The weight is about 8 oz for each 2x2 tile.
-
Do I have to use a filler/boarder with Faux Tin Ceiling Tiles?
No, it is not necessary but you certainly can if you preffer the look. There is a video that explains your options.
-
Where are the Faux Tin Ceiling Tiles made?
They are made in India and some of them are made in China.
Metal Ceiling Tiles
-
What are the metal ceiling tiles made of?
We offer 3 different materials.
- Tin Plated Steel ( this is the authentic, historically correct material. We offer it in its raw form as well as painted. In the raw form it is the most economical option. It has to be painted from both sides if you get it un-finished.)
- Aluminum ( this is the popular material because it will not rust. It may however oxidize if you purchase our Mill Finish Aluminum depending on the environment you use it in. To prevent that you need to paint the face of the tile or choose on of the many finishes.
- Actual Solid Copper (this is the high end item that most wish they could have. All of our metal designs are available in this material. Although we do not have images for all of the products in copper, we do have a page dedicated to it. Here it is: Copper Ceiling Tiles
-
What are the dimension of metal ceiling tiles?
Most of our real metal ceiling tiles come in either 24" x 24" size or 24" x 48". The actual sizes slightly differs depending on the application. If you choose a tile for a suspended ceiling system also known as drop ceiling or a grid system, it will be slightly smaller than 24" x 24" size and 24" x 48", the actual size would be close to 23 7/8" x 23 7/8" and 23 7/8" x 47 7/8".
If you go with a nail-up install option, the tiles are 24 3/8 x 24 3/8 inches or 24 3/8 x 48 3/8 inches. There are couple of odd sizes and we can also create custom tiles with a custom size.
-
Are metal ceiling tiles 3-D?
Yes, our metal tiles, just like the old fashioned tin are stamped out to create 3-dimensional designs. The depth of the tiles vary based on the design from 1/8" - about 3"
-
Are metal ceiling tiles painted?
We offer them in both versions, painted and unpainted when it comes to Steel and Aluminum, here are some beautiful color options for the Aluminum ceiling tiles. When it comes to copper, we offer it either natural or we age it and can offer a clear coat to protect the surface from aging further.
-
Can metal ceiling tiles be painted?
Yes, absolutely. However, we offer many colors from basic single colors that can be powder coated to artisan finishes done by an artist by hand.
-
What can be metal ceiling tiles cut with?
We like to recommend tin snips as they are most accessible.
-
How can metal ceiling tiles be installed?
We recommend 2 types of installation method for real metal and those are nail-up to a substrate such as plywood or furring strips or drop-in installation into a grid system. Some people also glue their tiles, the best one for gluing would be Aluminum as it is the lightest of the metals.
-
What kind of adhesive should be used for metal ceiling tiles?
If you do decide to nail up our tiles, consider using our 310 Instant Grab adhesive or equivalent to it, such as power grab from loctite. Make sure the surface is clean by wiping all the dust and/or dirt.
-
What is the weight of metal ceiling tiles?
This would depend on the size and metal you choose. Our lightest metal tile is Aluminum which comes in at about 0.75lb per, the steel/tin is about 1.5lb and copper 3lb 24"x24" tile.
-
Which metal tiles come in 2 ft x 4 ft / 24 in x 48 in?
We do have several designs that come in 2 ft x 4 ft/ 24 inches x 48 inches. Here they are: (please note that images only show 2x2 tiles at this time. 2x4 tiles look like 2, 2x2 tiles put together. To view the images, click on the following links) 0302, 0303, 0601, 0603, 0604, 0605, 0606, 0607, 0609, 1201, 1202DD, 1204, 1205, 1207, 1211, 1220, 2400, 2401, 2402, 2403, 2404, 2405, 2406, 2407, 2410, 2433, 2436, 2437, 2450. ( At this moment, there are only 2x2 tiles available for purchase on our website. To order 2x4 tiles, please Contact Us.
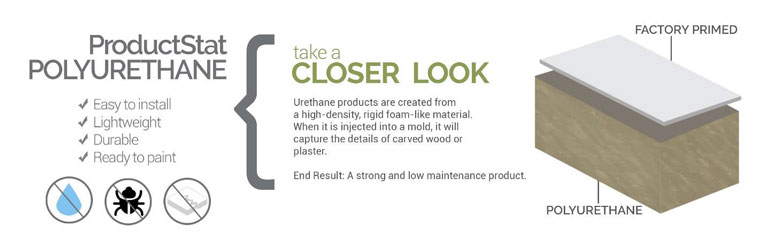
EKENA Urethane Millwork
-
How are urethane products made?
Polyurethane is formed when two chemicals react creating a foamlike structure. When this reaction occurs in one of product preprimed molds, the urethane foams, expands to the desired shape, and hardens. This reaction creates tremendous heat, causing the primer on the mold to fuse to the material, forming a hard, outer shell. A high-density product with crisp detail is then released from the mold.

-
Will these products melt in high temperatures?
All products, including wood and steel, will melt if the temperature is hot enough. However, urethane products will not melt under normal use conditions.
-
What types of special skills are needed to install urethane products?
None. If you can install wood products, you can easily install urethane products. They can be nailed, cut and sanded just like wood products.
-
Are special supplies needed to install polyurethane products?
Yes. We recommend using noncorrosive fasteners along with polyurethane compatible adhesive. The adhesive is recommended to place between decorative joints and to secure any piece to the wall along with mechanical fasteners.
-
What are some general tips about installing urethane products?
Never install products with fasteners only. For best results, always use noncorrosive fasteners along with polyurethane compatible adhesive on the back and at all decorative joints.
-
What types of weather conditions are necessary to install exterior urethane products?
For exterior applications, urethane products can be installed in any temperature, hot or cold, and in any kind of weather.
-
What type of maintenance is needed to keep urethane products looking good?
Very little, if painted with recommended quality exterior-grade latex paint. All urethane products are low maintenance millwork goods, making them ideal for both interior and exterior applications.
-
Will the product ever become infested with insects?
No, urethane products are not a source of food for insects as it is not made from wood.
-
Are urethane products affected by moisture?
No. Urethane does not absorb water as it is a closed-cell material. This closed-cell structure will prevent water absorption.
-
Why or how do people use urethane millwork?
Urethane is lightweight and easy to install, making it a top selection of both building professionals and consumers. Lightweight for quick and easy installation. Solid urethane offers maximum durability and minimal upkeep with sharp design clarity and high quality, pattern options. It can be cut, drilled, glued or screwed with common tools and comes factory primed and ready for paint or faux finish. Best of all it is resistant to moisture, insects, and peeling or splitting.
-
Do all urethane products come painted and ready to install?
The pre-primed surface is ready to stain or paint. Urethane products need to be painted. We recommend painting the product before installation and touching it up after installation is completed. Exterior product must be painted with an exterior grade 100% acrylic latex paint.
-
What kind of paint do I use after installation?
100% acrylic latex paint. Since all polyurethane products are subject to thermal expansion and contraction, it is recommended that consideration to lighter paints be selected in your choice of colors, as darker colors absorb more radiation from the sun than lighter colors. Flat, eggshell and satin finishes are recommended due to their slight porous nature during the curing process.
-
What are its best uses for the building industry?
Due to the ability to mold the material, decorative trims with detailed designs are easy to produce. Large moulding profiles can be made from one piece of urethane, instead of layering wood to create the same look. This saves on labor and time.
-
How do I prevent UV fading/deterioration?
UV rays do not affect properly finished product. Exterior product must be painted with an exterior grade 100% acrylic latex paint.
-
Anything special I should know about storing urethane products?
These products can be stored either inside or outside, but not in extreme heat. Products should be stored as it is intended to be installed. For optimum use, polyurethane compatible adhesive should be stored at room temperature until ready to use. Acclimate urethane products before installation up to 10 hours.
-
What are the recommended fastening procedures for urethane?
Please see installation instructions for part specific recommended fastening procedures. Note that products should never be installed with fasteners that are susceptible to corrosion, and proper use of glue and adhesives is crucial for correct installation.
-
Are your urethane products just decorative?
Polyurethane products are most commonly used for decorative purposes as the material by itself is non-structural. Even so, many polyurethane items do serve a functional purpose, like gable vents that help with attic ventilation or ceiling medallions that cover unsightly holes in the ceiling.
General Questions
-
Why should someone add ceiling decoration to their home?
The ceiling is the largest area of the room that mostly gets overlooked during renovation. This is a shame because the ceiling is like a blank canvas that will not be covered with furniture or rugs, artwork, etc. For this reason, if you decorate your ceiling makes a huge difference. Also, many surfaces, including a popcorn ceiling or old stapled on 12x12 acoustical tiles can be easily covered with decorative ceiling tiles.
-
How should someone decide on the finish for the tiles?
Based on the decor of the rest of the room, individual taste, and the height of the ceiling. Lighter colors make the room feel airier, and open. Darker colors for warmer looks and to match darker stained furniture.
-
Can you use the tiles elsewhere than on the ceiling?
Accent walls, backsplashes. Consider smaller patterns for the backsplash.
-
Why do your tiles work so well in historic homes?
Because they are from that era. Tin ceilings have been around for about 150 years and were used in Victorian homes a lot. We have done many replicas over the years to match existing ceiling tiles and cornices to preserve the historical value of residential and commercial properties.
-
Do your tiles work for new builds as well?
Absolutely! When you are building a new home there is flexibility that you may not have when renovating, which makes it easier to incorporate decorative ceiling tile in your new home.
-
Can I use decorative ceiling tiles on a ceiling with recessed lighting, vents and fans?
Yes you can and some of them will work better than other. Milan Jara has created a video that explains this in detail:
-
Do I need to use nail up or glue up ceiling tiles?
First thing you need to do is to look at your ceiling and determine the surface you have. You can use glue up tiles for most flat surfaces but if you have a plywood or wood ceiling, you can also use nail up tiles.
-
How do I estimate the number of ceiling tiles I need for my project?
Please refer to our
Ceiling Tiles
- Bead Board Ceilings
- Decorative Ceiling Ideas
- Ceiling Tiles as Headboard
- Can You Put Ceiling Tiles Over Drywall
- How Ceiling Tiles are Made
- Ceiling Coverings
- Drop Ceiling Ideas
- Ceiling Tiles Without Grid
- Ceiling Tiles 24x24
- What are Ceiling Panels Made Of
- Ceiling Tiles Replacement
- Ceiling Tiles for Commercial Kitchen
- Styrofoam Tiles Ceiling
- Ceiling Tiles 1200 X 600
- How Do You Modernize a Drop Ceiling
- Ceiling Tiles for Soundproofing
Wall Panels
- Faux Rock Wall Panels
- Concrete Wall Panels for Sale
- Tin Backsplash
- Faux Brick Panels for Walls
- Copper Tile
- Decorative Wall Panel
- Faux Stone Walls
- Beadboard Paneling
- Fluted Panel Wall
- Waterproof Shower Wall Panels
- Tin Wainscoting
- Copper Backsplash Tile
- Herringbone Shower Tile
- Acrylic Wall Panels
- PVC Wall Panels
- Kitchen Backsplash Panels
Moldings
- Polyurethane Crown Molding
- Crown Moldings for Ceilings
- Corner Block Moulding
- Foam Molding
- Crown Molding on Vaulted Ceiling
- Corner Molding
- Wall Molding Panels
- Trim Corner
- Crown Molding Light
- Decorative Metal Trim
- 6 Inch Baseboard
- Best Crown Molding for Low Ceilings
- Crown Molding Corner Blocks
- Molding Casing
- Modern Crown Molding
Popular Pages
- Ceiling Tile
- Ceiling Medallion Octagon
- 30 Inch Ceiling Medallion
- Small Ceiling Medallions
- J Tracks
- Faux Wood Mantels
- 24 Inch Ceiling Medallion
- Faux Wood Beams vs Real Wood Beams
- Window Pediments
- Are Faux Wood Beams Expensive
- Faux Beam Trusses
- Can You Buy Fake Beams
- 12 Inch Ceiling Medallion
- Faux Beam Entryway
- Decorative Ceiling Medallions
- Faux Rock Panels