


MirroFlex
Herringbone Shower Wall Panels by MirroFlex

Images are not true representations of the actual color of the product, some are computer generated. Be sure to order samples to make sure the colors will work for you.
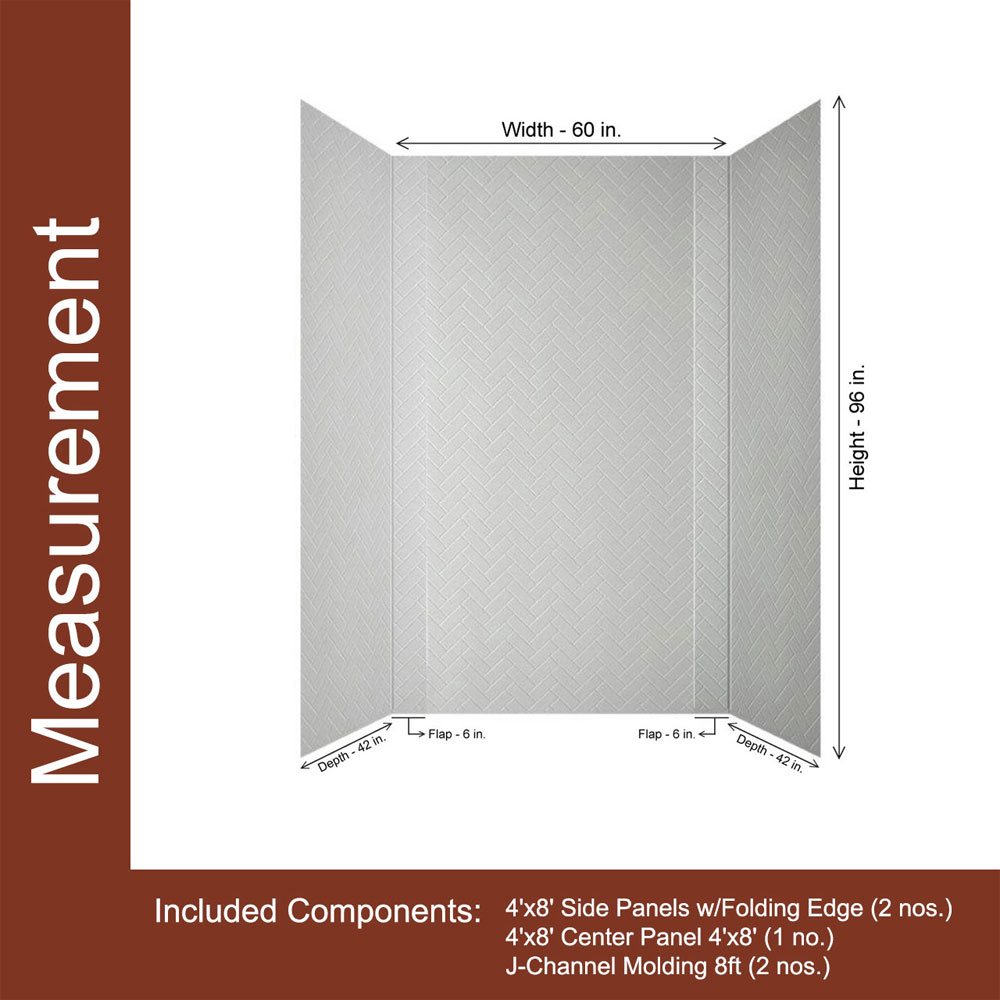
How Many Pieces Do I Need?
Project Estimator for
Do you like the look of this product but need help with installation? Learn more in our 'How To' section or get assistance from a professional installer.
$399.00
- Model No.
- 133-HERR-KIT
- Condition:
- New
- Availability:
- InStock
- Delivery:
- Gloss White - 1-2 business days | Others - 3 weeks lead time
- Weight:
- 29 pounds
- Height:
- 8 feet
- Width:
- 12 feet
- Depth:
- 0.2 inches
- Material:
- PVC
- Pattern Size:
- 8"
- Coverage:
- 96 square feet
- Pack Includes:
- Two 4'-by-8' side panels with folding edge, one 4'-by-8' center panel, two 8-foot J-channel moldings
- Material Thickness:
- 0.030"
- Installation Method:
- Glue-up
- Adhesive:
- Spray Lock FRP
- Adhesive Note:
- 1 tube covers 2 panels
- Colors Options:
- View Colors
- Return Policy:
- This product is made to order in the USA, and returns are not allowed. Consider ordering samples first to check the quality and finish.


Get a Herringbone Tile Shower Wall With Less Work
Herringbone wall tile just happens to be one of the hottest trends in home design today. The herringbone wall tile pattern is simply an arrangement of rectangular tiles. To achieve a herringbone wall tile pattern yourself, you'll need to grout the walls and lay down rectangular tile in a pattern that resembles the skeleton of a herring. Using a herringbone pattern will often require far more cuts than a straight set of tiles or those placed in an offset pattern, which will mean that you'll need to buy extra tiles, adding to the cost of this project. But there's a better way to get this great look in your bathroom: Use our herringbone shower tile panels and you'll save a bundle and save time, since they're far easier to install than ceramic tile and much more affordable.
Why Use Herringbone Bathroom Wall Tile Panels?
Using Herringbone tile in the shower is an ideal choice because it adds visual interest to a small space without looking too cluttered. Our herringbone tiles and tub surround kits are also practical: They're durable, non-porous, grout-free, and easy to install and maintain. These herringbone shower tile panels are made from waterproof PVC, so they're great to use in high-moisture areas.
How to Complement the Look of Your Herringbone Wall Tile
If you have a larger bathroom, carrying the herringbone look through the space can give the room a more unified look. Our herringbone shower wall panels pair nicely with individual herringbone wall tiles: Use them to create a stylish backsplash and add a subtle visual link between the sink and shower.
How to Install a Herringbone Tub Surround
Follow these simple steps to install herringbone shower wall panels in your bathroom:
- Bring the herringbone shower tile panels into your bathroom the day before you install them. This will allow the herringbone tile panels to acclimate to the humidity and temperature of your bathroom.
- Remove the shower fixtures from the wall.
- Trim your herringbone wall panels. Our shower surround panels are oversize to ensure a good fit; you'll need to measure and trim them to fit your particular shower.
- Measure out where you need to cut spaces for the shower fixtures and drill out the holes you'll need.
- Tape all three panels of herringbone tiles into position on your walls, just to make sure that everything fits right. Then, draw a pencil line along the tops of the panels, so you can easily see where the adhesive needs to end.
- Take down the panels and set them aside. Then, apply adhesive to the walls.
- Fit the panels into place. Make sure to work from the center to the edges and press evenly to remove any air bubbles.
- Trim the J-channel moldings and use silicone adhesive to apply them to the front edges of your herringbone tiles.
- Let the herringbone wall tiles dry, then add silicone caulk along the line where the panels meet the tub.
- Put back the shower fixtures.
Project Showcase
-
133-HERR-KIT - Gloss White
 Installed in Bathroom
 -
133-HERR-KIT - Bermuda Bronze
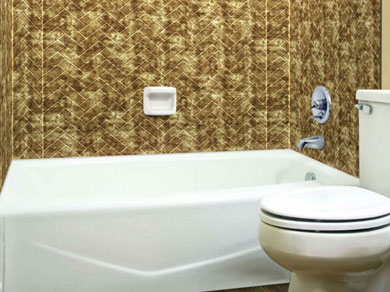 Installed in Bathroom
 -
133-HERR-KIT - Antique Bronze
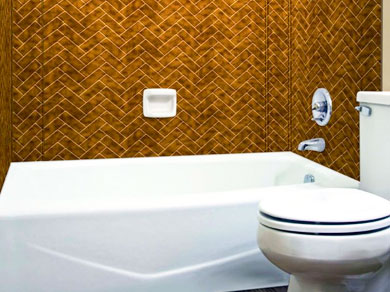 Installed in Bathroom
 -
133-HERR-KIT - Galvanized
 Installed in Bathroom
 -
133-HERR-KIT - Travertine
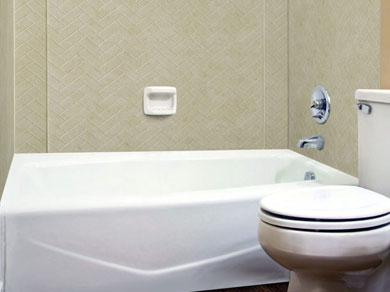 Installed in Bathroom
 -
133-HERR-KIT - Gloss White
 Installed in Bathroom
Technical Data
MirroFlex EccoFlex Technical Data Sheet MirroFlex Technical Info MirroFlex Structures Technical Info Spec SheetHow To Install
MirroFlex Tubs & Shower Walls Installation InstructionsTest Data
NRC Test Data ASTM C423 - Full-Size Reverberation Room NRC Test Data SAE J2883-Small Reverberation Room
Fire Rating Certificate
ASTM E-84 CBS 1000 Fire Ratings ASTM E-84 MirroFlex FR PETG Opaque with CBS1000 ASTM E-84 MirroFlex N439 Argent Silver ASTM E-84 MirroFlex Structure White PVC Drop-Out Ceiling Tile Burn TestCompatibility Study
DIVERSEY Healthcare Cleaning ProductsProposition 65
Proposition 65 Compliance Letter


Get a Herringbone Tile Shower Wall With Less Work
Herringbone wall tile just happens to be one of the hottest trends in home design today. The herringbone wall tile pattern is simply an arrangement of rectangular tiles. To achieve a herringbone wall tile pattern yourself, you'll need to grout the walls and lay down rectangular tile in a pattern that resembles the skeleton of a herring. Using a herringbone pattern will often require far more cuts than a straight set of tiles or those placed in an offset pattern, which will mean that you'll need to buy extra tiles, adding to the cost of this project. But there's a better way to get this great look in your bathroom: Use our herringbone shower tile panels and you'll save a bundle and save time, since they're far easier to install than ceramic tile and much more affordable.
Why Use Herringbone Bathroom Wall Tile Panels?
Using Herringbone tile in the shower is an ideal choice because it adds visual interest to a small space without looking too cluttered. Our herringbone tiles and tub surround kits are also practical: They're durable, non-porous, grout-free, and easy to install and maintain. These herringbone shower tile panels are made from waterproof PVC, so they're great to use in high-moisture areas.
How to Complement the Look of Your Herringbone Wall Tile
If you have a larger bathroom, carrying the herringbone look through the space can give the room a more unified look. Our herringbone shower wall panels pair nicely with individual herringbone wall tiles: Use them to create a stylish backsplash and add a subtle visual link between the sink and shower.
How to Install a Herringbone Tub Surround
Follow these simple steps to install herringbone shower wall panels in your bathroom:
- Bring the herringbone shower tile panels into your bathroom the day before you install them. This will allow the herringbone tile panels to acclimate to the humidity and temperature of your bathroom.
- Remove the shower fixtures from the wall.
- Trim your herringbone wall panels. Our shower surround panels are oversize to ensure a good fit; you'll need to measure and trim them to fit your particular shower.
- Measure out where you need to cut spaces for the shower fixtures and drill out the holes you'll need.
- Tape all three panels of herringbone tiles into position on your walls, just to make sure that everything fits right. Then, draw a pencil line along the tops of the panels, so you can easily see where the adhesive needs to end.
- Take down the panels and set them aside. Then, apply adhesive to the walls.
- Fit the panels into place. Make sure to work from the center to the edges and press evenly to remove any air bubbles.
- Trim the J-channel moldings and use silicone adhesive to apply them to the front edges of your herringbone tiles.
- Let the herringbone wall tiles dry, then add silicone caulk along the line where the panels meet the tub.
- Put back the shower fixtures.
Project Showcase
-
133-HERR-KIT - Gloss WhiteInstalled in Bathroom
-
133-HERR-KIT - Bermuda BronzeInstalled in Bathroom
-
133-HERR-KIT - Antique BronzeInstalled in Bathroom
-
133-HERR-KIT - GalvanizedInstalled in Bathroom
-
133-HERR-KIT - TravertineInstalled in Bathroom
-
133-HERR-KIT - Gloss WhiteInstalled in Bathroom